#User Manual for Resolution and Status Colors JIRA Plugin
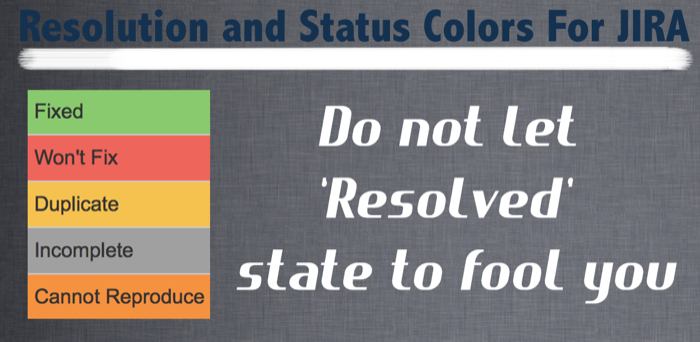
Resolution Colors Plugin enables issues to be shown with different color depending on their resolution and Status Colors. Why do you need this, aren’t just the Status Colors enough? Unfortunately, no. Because unlike most other issue management systems, a ‘Resolved’ status does not show that the issue is solved. An issue may be resolved because assignee may have decided not to implement it with specifying a “Won’t Fix”, “Cannot Reproduce” or “Incomplete” resolution. So while checking resolved issues, you have to pay special attention to the ‘Resolution’ field. So what this plugin does is that; this plugin makes it easier to highlight issues according to their resolution type for issue reporters or verifiers. But if you want, you can use this plugin in a way that it only highlights issues based on their status.
Initial Configuration
After installing plugin you have to do some initial configuration to activate plugin’s features. The first thing you should do is adding a new custom field of type ‘Resolution Color’. Although the name of this field is ‘Resolution’ it can also highlight issues based on their Status.
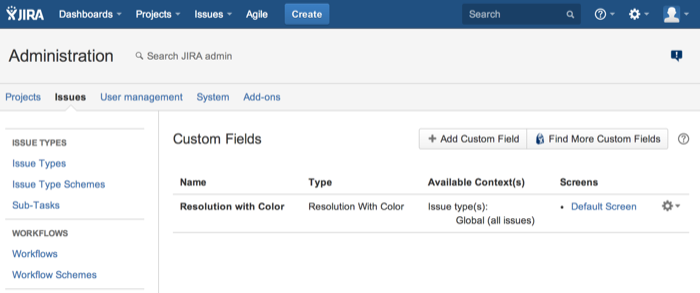
- From issue administration page, scroll down to ‘Fields’ section and click on ‘Custom Fields’ link. List of your existing custom fields will be displayed. Select ‘Add Custom Field’ from top right of the page.

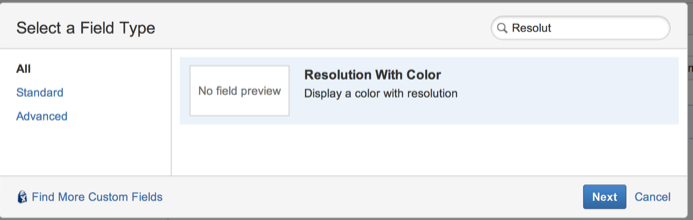
- A pop-up dialog box will be opened. Select ‘All’ and write ‘Resolution’ to search field. ‘Resolution with Color’ custom field type will be displayed as shown in the following figure. Select it and click ‘Next’.
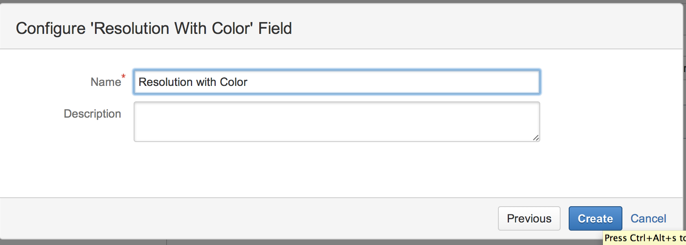
- Enter a name for the new custom field. This name will be displayed as the column name in the issue list. You can enter any description you want, it won’t be displayed to end users. Finally click on ‘Create’ and your custom field will be created.
-
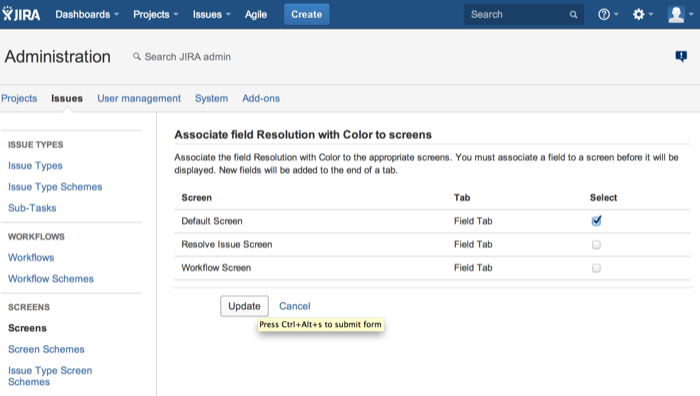
You have to select, on which screens this custom field will be shown. You have to select every screen that contains resolution field, and you want issues to be colored according to their resolution.
-
Your custom field is now ready to use in issue detail pages. But you have to configure the issue list pages too.
-
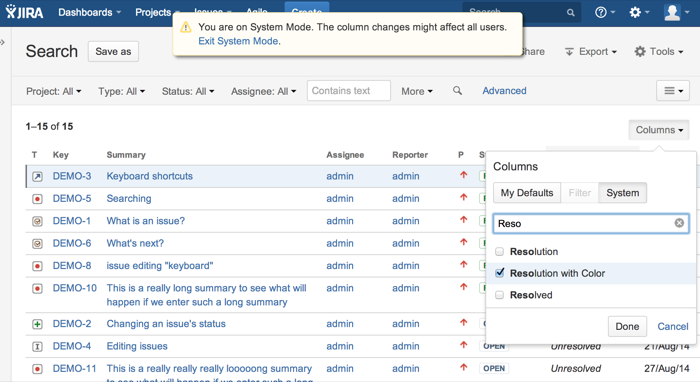
Open the issue list and click on ‘Columns’ on top right of the page. Write ‘Resolution’ to the search field and two Resolution fields should be displayed. ‘Resolution’ is JIRA’s build in ‘Resolution’ field and ‘Resolution with Color’ is our new custom field. De-select ‘Resolution’ and select ‘Resolution with Color’ field and click on ‘Done’. If you change your systems default column layout, every user will start with that layout. But if they have already an active column layout they will need to add ‘Resolution with Color’ field to their column layout as well.
Note that, you can even add this column to your issue lists in dashboards to make them colored.
List Views
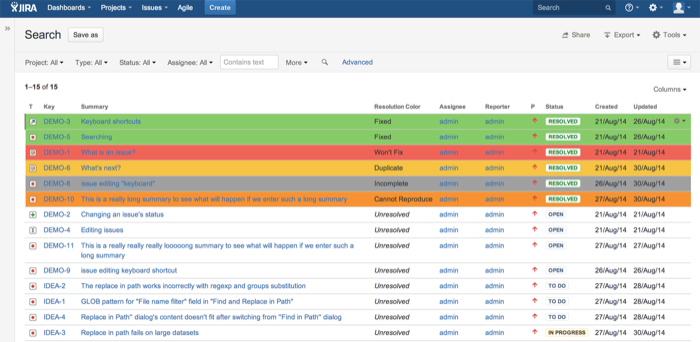
For issue list to be colored you have to add ‘Resolution Color’ custom field to the column list. Without it, there won’t be any coloring in issue list view. You may add this field to default list view columns so that it becomes active for all users by default.
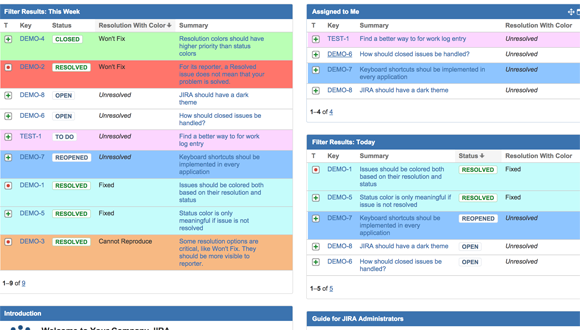
You can also colorize issues in dashboard widgets by adding the same ‘Resolution with Color’ field to columns shown in the dashboard.
Issue Detail View
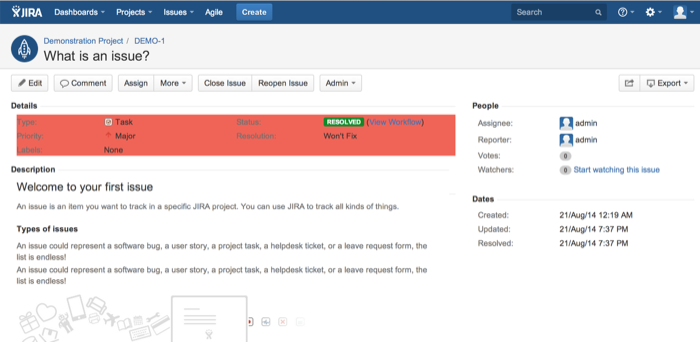
Depending on plugin’s settings different parts of the issue details view are highlighted. Please see ‘Plugin Settings’ section.
Plugin Settings
You can use the plugin without adjusting any settings. It comes with reasonable defaults. But if you want further customization, or your JIRA Status and Resolution fields are highly customized you may want to tune Plugin’s Settings. There are two settings page, one for ‘Resolution Colors’ and the other for ‘Status Colors’.
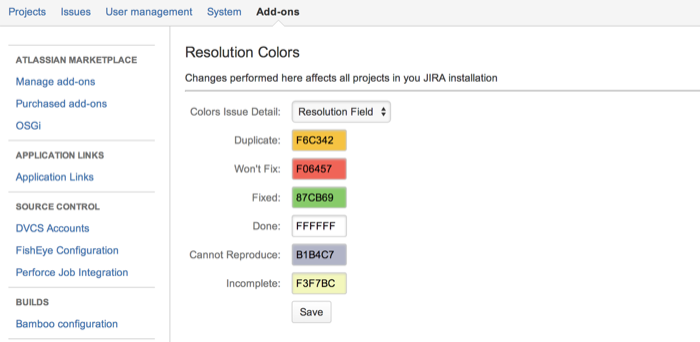
Resolution Colors
Plugin assigns its default colors to JIRA’s built in ‘Resolution’ options. If you have custom ‘Resolution’ options you may also assign colors to them. You can also change predefined colors for build in ‘Resolution’ options. Be careful while selecting a resolution color, each device (Projector, Printer, Screen) may display colors differently and this may cause issue details to be unreadable if you select a color that is close to black (normal text color), or blue (link color). So in general, avoid dark colors. For example if you want to use red try to select a very light red.
In addition to the color, you can also select which part of the issue detail view to be highlighted.
- Header : All issue details fields are colored.
- Resolution : Only the resolution field is colored.
- None : Coloring is turned off.
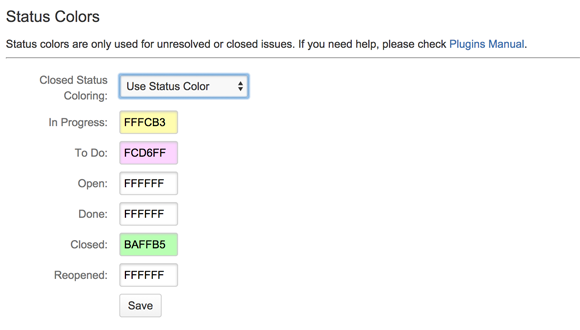
Status Colors
If you need to differentiate issues based on their status you have to configure Status Colors too. The key is that Resolution Colors have priority over Status Colors. For resolved issues their Resolution Color is used. This is why there is no color setting for “Resolved” status in ‘Status Colors’ configuration page. There is a special case however, the plugin allows you to use ‘Status Color’ of Closed status instead of ‘Resolution Color’ if you set it from ‘Closed Status Coloring’ configuration option.
Closed Status Coloring
- Use Status Color : For closed issues their Status Color is used instead of Resolution Color.
- Resolution Color : For closed issues their Resolution Color is used.
If you want to use this plugin to highlight issues based only on their status field, you can. You have to specify the same color to every Resolution option and assign different colors to Status options.